 English
 简体中文
简体中文
 ru
ru
 es
es

How to Test an Excavator Solenoid Valve?
1. Introduction

Excavator hydraulic solenoid valve for heavy equipment
Excavator solenoid valves are essential components in hydraulic control systems. They regulate oil flow, control hydraulic functions, and ensure smooth operation of the excavator. When a solenoid valve fails, the machine may experience slow movement, attachment malfunction, hydraulic pressure issues, or even complete operational failure.
Understanding how to test an excavator solenoid valve can help operators and technicians quickly diagnose problems, reduce downtime, and avoid costly repairs. In this guide, we will explain the common symptoms of a faulty solenoid valve, the tools required for testing, and step-by-step troubleshooting methods for excavator hydraulic systems.
2. What Does an Excavator Solenoid Valve Do?
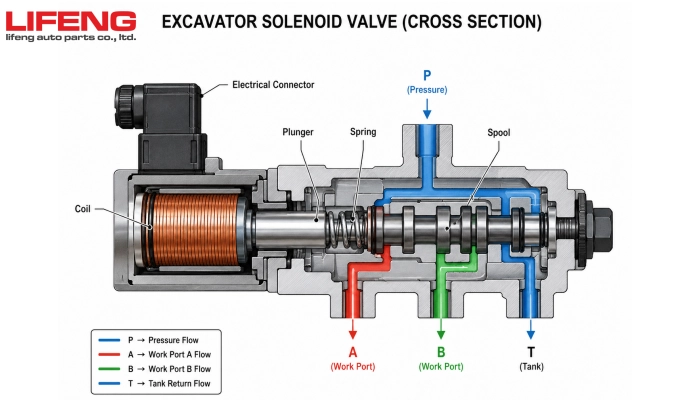
Cross section diagram of an excavator solenoid valve showing coil and plunger
An excavator solenoid valve controls the flow of hydraulic oil inside the machine’s hydraulic system. It uses electromagnetic force to open or close internal valve passages, allowing hydraulic fluid to move between different components.
In modern excavators, solenoid valves are commonly used to control travel speed, boom movement, swing functions, auxiliary attachments, and pilot hydraulic circuits. When the operator activates a control lever or switch, an electrical signal energizes the solenoid coil, which then moves the valve spool to direct hydraulic flow.
Because excavators operate in harsh environments with vibration, heat, dust, and moisture, solenoid valves can wear out over time and may require regular inspection and testing.
3. Common Symptoms of a Bad Excavator Solenoid Valve
A faulty excavator solenoid valve can cause various hydraulic and electrical problems. Identifying these symptoms early can help prevent severe machine damage and expensive downtime.
- Slow or weak hydraulic movement
- Excavator attachment not responding
- Travel speed cannot switch properly
- Hydraulic functions stop intermittently
- Unusual clicking or buzzing noise
- Blown fuse or electrical overload
- Overheating solenoid coil
- Hydraulic pressure instability
- Machine enters safety or limp mode
In many cases, these symptoms may indicate coil failure, damaged wiring, contamination inside the valve, or insufficient electrical voltage reaching the solenoid.
4.Tools Needed to Test a Solenoid Valve
Before testing an excavator solenoid valve, prepare the necessary diagnostic tools to ensure accurate results and safe operation.
- Digital multimeter
- DC power supply or battery
- Hydraulic pressure gauge
- Screwdrivers and basic hand tools
- Cleaning cloth and contact cleaner
- Machine service manual
- Protective gloves and safety glasses
Using proper testing equipment allows technicians to quickly identify electrical faults, coil damage, voltage problems, and hydraulic response issues.
5. Step-by-Step: How to Test an Excavator Solenoid Valve

Technician testing excavator solenoid valve coil with digital multimeter
Step 1: Perform a Visual Inspection
Start by visually inspecting the excavator solenoid valve and surrounding wiring. Many solenoid valve failures are caused by external damage rather than internal component failure.
Check for the following issues:
- Loose or damaged electrical connectors
- Broken wires or poor grounding
- Oil leakage around the valve body
- Corrosion caused by moisture
- Burn marks or melted coil housing
- Dust or debris contamination
If any visible damage is found, repair or replace the affected components before continuing with electrical testing.
Step 2: Test the Solenoid Coil Resistance
One of the most important steps in excavator solenoid valve testing is measuring the coil resistance using a digital multimeter.
First, disconnect the electrical connector from the solenoid coil. Set the multimeter to the resistance (Ohms) setting and place the probes on the coil terminals.
A healthy solenoid coil usually shows resistance within the manufacturer’s specified range. If the multimeter displays infinite resistance, the coil may be open or burned out. Extremely low resistance may indicate an internal short circuit.
Abnormal resistance readings are often signs of coil failure and usually require replacement of the solenoid coil assembly.
According to Ohm’s Law, resistance is directly related to voltage and current flow inside the solenoid coil. Stable resistance values usually indicate proper electrical condition.
Step 3: Apply Power to the Solenoid Valve
After checking coil resistance, apply the correct voltage to the solenoid valve to verify magnetic activation.
Connect the solenoid coil to an appropriate power source according to the machine specifications. When energized, the solenoid should produce a clear clicking sound as the internal plunger moves.
If there is no clicking sound or movement, the coil may be defective, the internal plunger may be stuck, or the supplied voltage may be insufficient.
Avoid applying incorrect voltage for extended periods, as overheating can permanently damage the solenoid coil.
6. How to Tell If the Solenoid Coil Is Bad

Damaged excavator solenoid coil with overheating marks
A damaged excavator solenoid coil may show several warning signs during operation and testing.
No magnetic response when power is applied
- Burning smell from the coil housing
- Intermittent hydraulic operation
- Coil surface overheating
- Blown fuses during machine operation
- Abnormal resistance readings
In most cases, a burned or shorted solenoid coil cannot be repaired and should be replaced with a high-quality compatible replacement coil.
7.Preventive Maintenance Tips
Regular maintenance can significantly extend the service life of excavator solenoid valves and reduce unexpected hydraulic failures.
- Keep electrical connectors clean and dry
- Inspect wiring regularly for wear or vibration damage
- Avoid exposing the coil to excessive heat
- Replace damaged seals to prevent oil contamination
- Check voltage supply during routine maintenance
- Clean hydraulic systems to reduce internal contamination
Proper preventive maintenance not only improves excavator performance but also reduces machine downtime and repair costs.
8.Conclusion
Testing an excavator solenoid valve is an important part of hydraulic system troubleshooting and preventive maintenance. By performing visual inspection, resistance testing, and power activation checks, technicians can quickly identify faulty components and restore machine performance.
If your excavator experiences hydraulic control problems or solenoid coil failure, replacing damaged components with reliable aftermarket or OEM-compatible parts can help minimize downtime and improve operational efficiency.
Our factory specializes in high-quality excavator solenoid valve coils compatible with major brands including JCB, Komatsu, Hitachi, Kobelco, Volvo, and Hyundai. Contact us for OEM manufacturing and bulk order support.
